[3] Użycie urządzenia blokowego
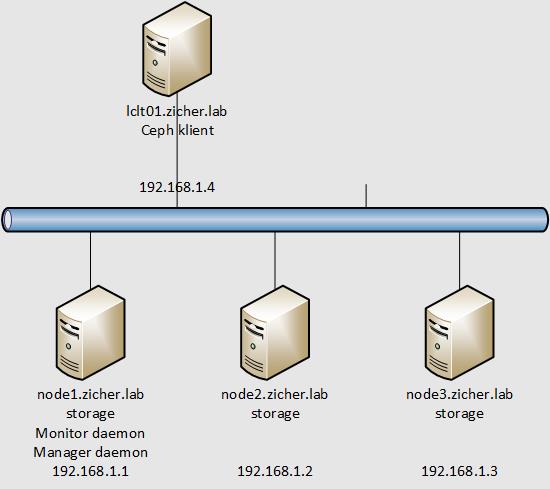
14 lipca 2020Skonfigurujemy teraz klienta/hosta [lclt01] do użycia zasobów Ceph.
Sieć przedstawia się następująco.

W tym przykładzie stworzymy urządzenie blokowe i zamontujemy go na kliencie/hoście.
[1] Przetransferuj klucz publiczny do klienta i skonfiguruj go z Admin Node.
# transfer klucza publicznego
[root@node1 ~]# ssh-copy-id lclt01
/usr/bin/ssh-copy-id: INFO: Source of key(s) to be installed: „/root/.ssh/id_rsa.pub”
The authenticity of host 'lclt01 (192.168.1.4)’ can’t be established.
ECDSA key fingerprint is SHA256:xCSfk21sQFwJhliPbBPX2XKMsivyZLuNzGRs03N3HoU.
Are you sure you want to continue connecting (yes/no/[fingerprint])? yes
/usr/bin/ssh-copy-id: INFO: attempting to log in with the new key(s), to filter out any that are already installed
/usr/bin/ssh-copy-id: INFO: 1 key(s) remain to be installed — if you are prompted now it is to install the new keys
root@lclt01’s password:
Number of key(s) added: 1
Now try logging into the machine, with: „ssh 'lclt01′”
and check to make sure that only the key(s) you wanted were added.
# instalacja potrzebnych pakietów
[root@node1 ~]# ssh lclt01 „dnf -y install centos-release-ceph-octopus epel-release”
[root@node1 ~]# ssh lclt01 „dnf -y install ceph-common”
# skopiuj potrzebne pliki na klienta
[root@node1 ~]# scp /etc/ceph/ceph.conf lclt01:/etc/ceph/
ceph.conf 100% 281 197.1KB/s 00:00
[root@node1 ~]# scp /etc/ceph/ceph.client.admin.keyring lclt01:/etc/ceph/
ceph.client.admin.keyring 100% 151 5.0KB/s 00:00
[root@node1 ~]# ssh lclt01 „chown ceph. /etc/ceph/ceph.*”
[2] Stwórz urządzenie blokowe i zamontuj je na hoście/kliencie.
# stwórz domyślną pulę RBD [rbd]
[root@lclt01 ~]# ceph osd pool create rbd 128
pool 'rbd’ created
# włącz tryb autoskalowania
[root@lclt01 ~]# ceph osd pool set rbd pg_autoscale_mode on
set pool 2 pg_autoscale_mode to on
# zainicjuj pulę
[root@lclt01 ~]# rbd pool init rbd
[root@lclt01 ~]# ceph osd pool autoscale-status
POOL SIZE TARGET SIZE RATE RAW CAPACITY RATIO TARGET RATIO EFFECTIVE RATIO BIAS PG_NUM NEW PG_NUM AUTOSCALE
device_health_metrics 0 3.0 149.9G 0.0000 1.0 1 on
rbd 19 3.0 149.9G 0.0000 1.0 32 on
# stwórz urządzenie blokowe o rozmiarze 10G
[root@lclt01 ~]# rbd create –size 10G –pool rbd rbd1
# potwierdź jego wykonanie
[root@lclt01 ~]# rbd ls -l
NAME SIZE PARENT FMT PROT LOCK
rbd1 10 GiB 2
# zamapuj urządzenie blokowe
[root@lclt01 ~]# rbd map rbd1
/dev/rbd0
# potwierdź
[root@lclt01 ~]# rbd showmapped
id pool namespace image snap device
0 rbd rbd1 – /dev/rbd0
# sformatuj je jako XFS
[root@lclt01 ~]# mkfs.xfs /dev/rbd0
meta-data=/dev/rbd0 isize=512 agcount=16, agsize=163840 blks
= sectsz=512 attr=2, projid32bit=1
= crc=1 finobt=1, sparse=1, rmapbt=0
= reflink=1
data = bsize=4096 blocks=2621440, imaxpct=25
= sunit=16 swidth=16 blks
naming =version 2 bsize=4096 ascii-ci=0, ftype=1
log =log wewnętrzny bsize=4096 blocks=2560, version=2
= sectsz=512 sunit=16 blks, lazy-count=1
realtime =brak extsz=4096 blocks=0, rtextents=0
[root@lclt01 ~]# mount /dev/rbd0 /mnt
[root@lclt01 ~]# df -hT
System plików Typ rozm. użyte dost. %uż. zamont. na
devtmpfs devtmpfs 473M 0 473M 0% /dev
tmpfs tmpfs 490M 0 490M 0% /dev/shm
tmpfs tmpfs 490M 6,8M 483M 2% /run
tmpfs tmpfs 490M 0 490M 0% /sys/fs/cgroup
/dev/mapper/cl-root xfs 17G 1,8G 15G 11% /
/dev/sda2 ext4 976M 151M 759M 17% /boot
/dev/sda1 vfat 599M 6,8M 593M 2% /boot/efi
tmpfs tmpfs 98M 0 98M 0% /run/user/0
/dev/rbd0 xfs 10G 105M 9,9G 2% /mnt
[3] Kasowanie urządzenia blokowego lub puli, które stworzyłeś wcześniej. Dla skasowania puli trzeba ustawić [mon allow pool delete = true] na [Monitor Daemon].